How to Use Yellow Mop Bucket | Simplify Cleaning Today!

To use a yellow mop bucket, fill it with cleaning solution, and immerse the mop. Wring excess water by using the attached wringer.
A vital tool in maintaining clean floors in commercial and residential settings is the yellow mop bucket. Not just any container, it’s often color-coded for specific tasks to avoid cross-contamination. Equipped with a wringer, it simplifies the process of mopping by efficiently managing the water or cleaning solution.
Its bright color typically designates it for universal or cautionary use, alerting people to potential hazards like wet floors. Learning to operate a yellow mop bucket properly can save time, improve cleaning effectiveness, and enhance safety in any space. By following simple steps, users ensure that floors are not overly wet and are cleaned thoroughly, conserving both water and cleaning agents in the process, which is both cost-efficient and environmentally friendly.
The Yellow Mop Bucket: A Staple In Efficient Cleaning
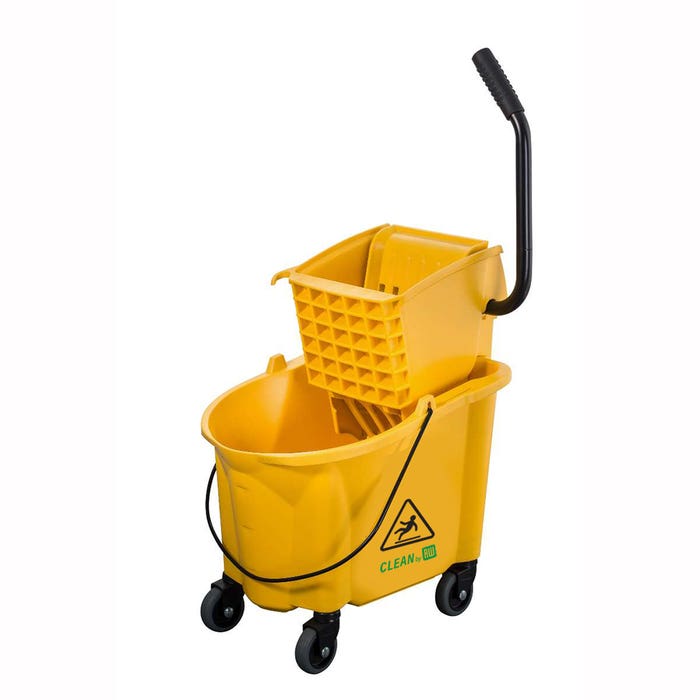
The yellow mop bucket stands out for its smart design. It makes cleaning jobs swift. Keeping spaces sparkling is easier than ever. Let’s explore its unique features.
- Color-coded cleaning avoids cross-contamination.
- A built-in wringer makes it simple to dry mops.
- The heavy-duty wheels ensure smooth movement.
- Its graduated marks help measure the right water amount.
Setting Up Your Mop Bucket For Optimal Use
Assembling your yellow mop bucket involves a few simple steps. Make sure that all components are connected properly. The bucket typically comes with a wringer attachment; secure this firmly at the top. A tightly-fixed wringer ensures safety and efficiency while mopping.
Choosing the correct cleaning solution is crucial for effective cleaning. For general mopping, mix a mild detergent with warm water. Utilize manufacturer-recommended solutions for tougher stains. Always adhere to the recommended dilution ratios to prevent floor damage. This helps preserve floor finish and maximizes cleaning power.
Mastering The Mop: Techniques For Effective Floor Cleaning
Proper mopping motions ensure effective and efficient floor cleaning. Begin with the mop in a figure-eight movement for maximum coverage. This technique keeps the mop head moving smoothly, preventing dirt from resettling on the floor. It’s best to start at the farthest corner and work towards the entrance. Ensure to overlap each stroke to avoid missing spots.
Keeping the mop clean during use is vital for maintaining mop hygiene. After mopping a section, rinse the mop in the yellow bucket to remove dirt. Wring it well to eliminate excess water, keeping floors from becoming too wet. Replace the cleaning solution if it looks dirty. This stops dirt from transferring back to the floor. Clean, wring, and repeat is the motto for maintaining mop hygiene.

Credit: www.restaurantware.com
Avoiding Cross-contamination With The Dual Chamber System
Yellow mop buckets with dual chambers help keep clean and dirty water separate. One side is for dipping and rinsing the mop; it’s your rinse basin. The other, the wash basin, holds your soap and cleaning solution. By using both sides, you make sure germs don’t spread from the dirty water to clean areas.
It’s important to know the right time to change the mop bucket water. Change it when it looks dark, has floating debris, or is no longer soapy. This makes sure your floor gets truly clean. If the water is dirty, the floor may end up more contaminated after cleaning. Clean water ensures effective sanitization and shines.
Maintenance And Storage For Longevity
Cleaning your yellow mop bucket properly extends its life. After use, remove all the dirty water. Wash the inside with mild soap and warm water. Rinse thoroughly to eliminate any soap residue. Avoid harsh chemicals that can damage the bucket.
For storing the mop system, ensure the bucket is completely dry to prevent mold. Place it in an upright position in a cool, dry place. Coil the mop handle next to or on a hook above the bucket to keep it tidy and ready for its next use.

Credit: www.amazon.com
Advanced Tips And Tricks
Yellow mop buckets are not just for floors. Get creative and think out of the box. Try using them to water plants or as a mobile container for garden tools. Their wheels make moving tools around the yard a breeze. Divide the bucket into sections to organize cleaning supplies. This makes it easy to carry everything in one go. Save time by preparing multiple cleaning solutions in one bucket. This way, you’re ready for any cleaning challenge.
- Color-code buckets to avoid cross-contamination.
- Attach a longer handle to reduce bending and back strain.
- Use a timer to monitor soaking times for better results.
- Maintain mop buckets regularly for peak performance.
Transform a yellow mop bucket into a portable cooler for picnics. Fill it with ice to keep drinks cold. Or use it as a temporary storage for kids’ toys. This makes clean-up fun and easy for children. During car washes, the bucket can hold soapy water or rinse your car sponges. The possibilities with a yellow mop bucket go far beyond just cleaning floors.

Credit: www.walmart.com
Conclusion
Mastering the use of a yellow mop bucket is simple yet vital for efficient cleaning. Embrace this handy tool to keep your spaces spotless. Remember, diligence and the right technique ensure longevity for your mop and bucket. Now that you’re equipped with this knowledge, happy cleaning!


