How to Repair O Cedar Spin Mop Bucket: Quick Fix Guide

To repair an O-Cedar spin mop bucket, first identify the issue such as a broken pedal or stuck spinning mechanism. Then, reference the user’s manual for specific troubleshooting guidance or replace faulty parts.
Keeping your cleaning tools in working order is essential for maintaining a clean home, and the O-Cedar spin mop bucket is no exception. Over time, wear and tear can affect its function, potentially halting your cleaning routine. A functional O-Cedar mop bucket ensures efficient and effective floor cleaning, and timely repairs can save costs associated with complete replacements.
This article provides actionable insights into diagnosing common issues and executing simple repairs on your O-Cedar spin mop bucket, helping you preserve its longevity and reliability. Whether you’re a savvy DIYer or a first-time mop owner, you’ll find these tips invaluable for getting back to spotless floors in no time.

Credit: www.amazon.com
Signs Your O Cedar Spin Mop Bucket Needs Repair
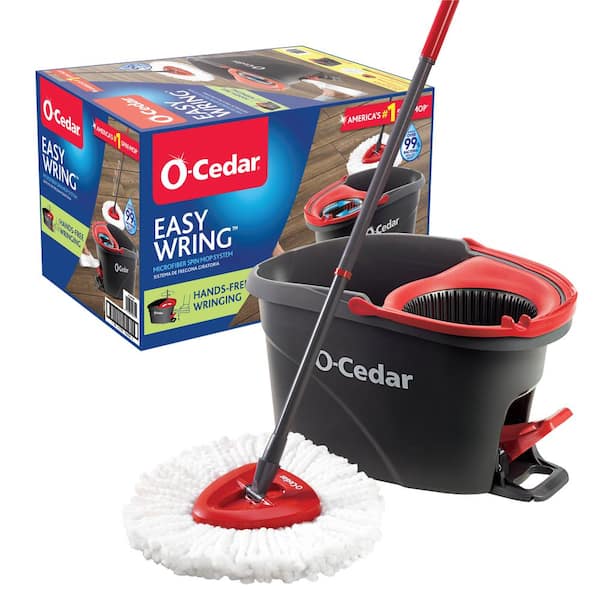
Noticing issues with your O Cedar Spin Mop Bucket? It might be time for a fix. Several signs indicate that repair is necessary. One common complaint is pedal malfunctions. This can make spinning the mop difficult or impossible.
If the bucket handle feels weak or wobbly, this is another sign you need repairs. A sturdy handle is crucial for carrying a full bucket. Lastly, spinning mechanism issues can occur. This includes difficulty in spinning or a lack of water wringing. Regular maintenance can prevent some problems. But sometimes, parts wear out and need replacement.
:max_bytes(150000):strip_icc()/rsp-detail-o-cedar-easywring-spin-mop-and-bucket-system-hwortock-015-1-1-0b642d5563d3477b9eb519d975efad3c.jpeg)
Credit: www.realsimple.com
Essential Tools And Materials
Fixing an O Cedar spin mop bucket requires certain tools and materials. Always have screwdrivers, pliers, and wrenches. A mop head and a handle may also be needed. Substituting old parts is sometimes a must. Look for spin mechanism components or a pedal if broken.
Your safety is key. Wear protective gloves and goggles. Keep your workspace clean. Make sure the bucket is empty and on a flat surface. By following these steps, you can repair your mop bucket safely and efficiently.
Step-by-step Repairing The Pedal
Repairing an O Cedar Spin Mop Bucket becomes necessary when the pedal fails. First, turn your mop bucket upside down. Uncover the pedal assembly carefully. Look for visible signs of wear or damage. It’s the first step in troubleshooting common pedal issues.
Examine the springs and gears within the pedal mechanism. Check if they are in proper place and intact. Frequently, springs may dislodge or break due to pressure. Gears should be smooth with no broken teeth. Confirm all parts move freely without unnecessary strain.
| Step | Action | Check |
|---|---|---|
| 1 | Remove the pedal | Use tools if necessary |
| 2 | Inspect Parts | Look for signs of damage |
| 3 | Test Mechanism | Ensure smooth motion |
For a pedal replacement process, find the correct spare part. Styles and models may vary, so choose the right one. Replace the damaged pedal with a new one. Align the pedal with the assembly, then secure it. Test the pedal before flipping the bucket right side up. Successful repair should restore full functionality.
Fixing The Spinning Mechanism
To repair an O Cedar Spin Mop bucket, you must first dismantle the spin mechanism. Carefully unscrew and remove the parts, keeping track of each piece. Inside, you’ll likely find gears that may need attention. Check for any broken or worn-out gears. Replace them if necessary. Next, confirm that gear teeth align properly. This ensures smooth spinning action.
- Clean all components to remove debris and buildup.
- Lubricate gear parts to minimize friction.
- Adjust tension if the spin feels too loose or tight.
Once all issues are addressed, start reassembly. Place each gear back in its original position. Test the mechanism frequently while reassembling to be sure it spins correctly. After full assembly, your mop bucket should be ready to use again.
Strengthening The Bucket Handle
Assessing the handle damage is crucial before any repair. Look for breaks or weak spots. A bent handle may need straightening. Cracks often require applying a strong adhesive. Deep damage could call for handle replacement.
Handle repair or replacement comes next. For minor issues, reinforce with tape or use a metal sleeve. Major damage means getting a new handle. Ensure compatibility with your bucket model. Follow manufacturer instructions for fitting the new handle.
Tips for maintaining a strong handle include cleaning it regularly. Avoid overloading the bucket. Store in a cool and dry area. Regularly check for signs of wear. Handle it with care during use. These measures prolong the handle’s lifespan.

Credit: www.pinterest.com
Long-term Maintenance Tips
Regular cleaning ensures your O Cedar Spin Mop Bucket lasts longer. Start by emptying the bucket and rinsing with warm water. Use a mild detergent to scrub the inside. Rinse thoroughly with clean water. Always dry the bucket before storing to prevent mold.
- Never overload the bucket with excess water.
- Avoid using harsh chemicals that can damage the bucket.
- Do not use the mop to clean off sharp objects.
If the mop bucket’s mechanism fails, it is time to seek help. Professional repair services can handle complex issues. Reach out immediately to prevent further damage.
Conclusion
Repairing an O Cedar spin mop bucket doesn’t have to be daunting. With these straightforward steps and a pinch of DIY spirit, you can extend your mop’s life without hassle. Remember, regular maintenance is key. Keep your O Cedar spinning smoothly, and your floors will thank you for it.